


MapLibre React Native v11 shows free OpenStreetMap vector maps in Expo and React Native apps; point its Map at a Geoapify style URL and you have a production map in minutes. In this tutorial you build an Expo app in TypeScript that renders a Geoapify map, adds a marker, and draws real cafés from the Geoapify Places API. Every step shows the exact code from our tested example project on GitHub, plus what you should see on the device.
Key takeaways
- v11 is a new API:
MapViewis nowMap, and the library supports only the React Native new architecture. - No Expo Go: MapLibre React Native contains native code, so you run the app as a development build.
- Config plugin:
npx expo installadds the@maplibre/maplibre-react-nativeplugin toapp.jsonfor you. - Map cost: the Geoapify Free plan includes 3,000 credits per day, and a map tile costs 0.25 credits (about 12,000 tiles per day).
- Places cost: the Places API charges 1 credit for every 20 places, so the café request in this tutorial costs 1 credit.
On this page
What Will You Build?
The finished app is a single full-screen map centered on Santa Fe Plaza, New Mexico. It uses the Geoapify osm-bright vector style, which is based on OpenStreetMap data, and it contains:
- a purple "Plaza" marker built from a regular React Native
View; - up to 20 nearby cafés from the Places API, drawn as orange circles;
- a light/dark button that switches between the
osm-brightanddark-matterstyles.
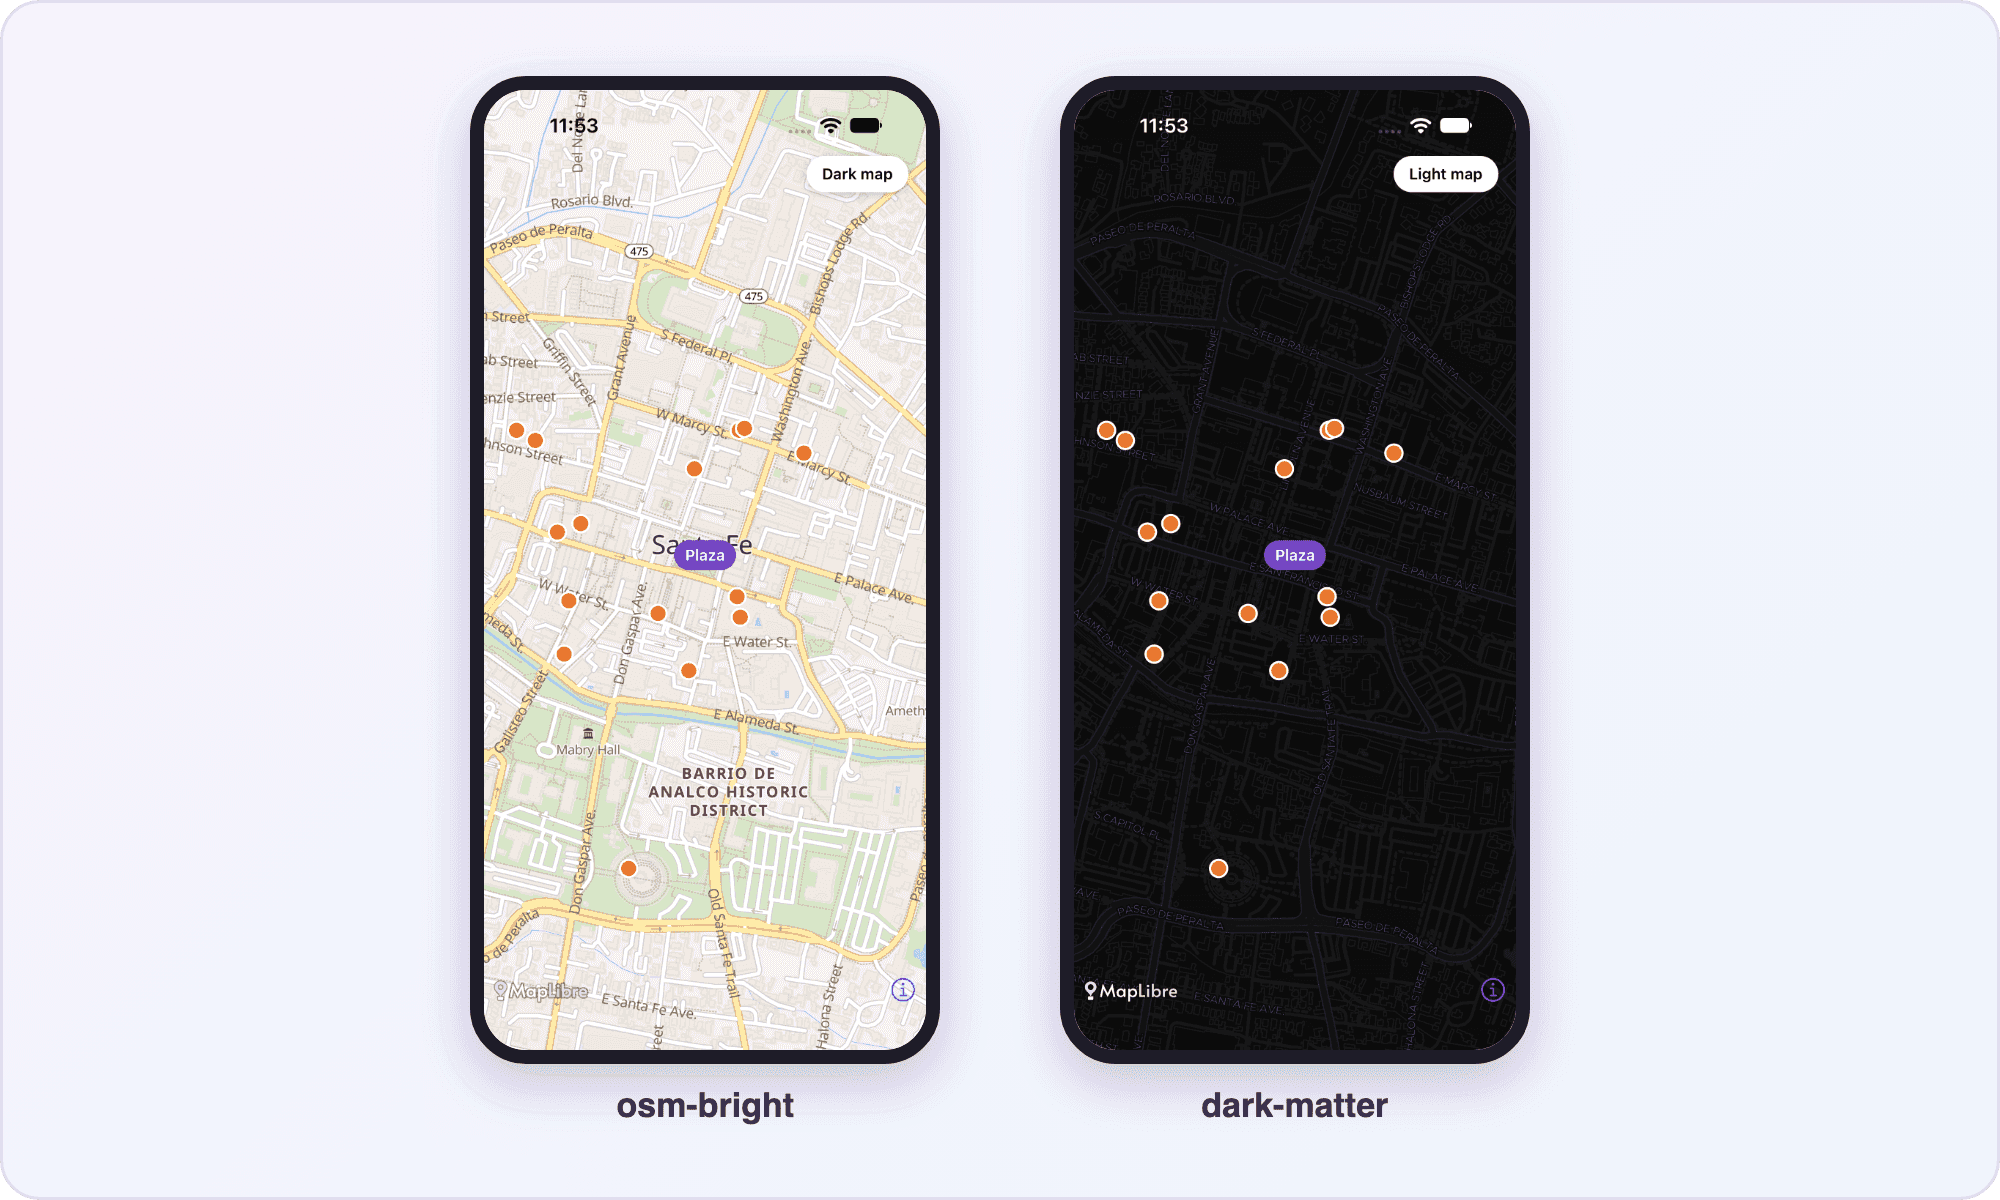
The app uses five MapLibre React Native components: Map, Camera, Marker, GeoJSONSource and Layer. Together they cover what most location apps need first: a basemap, an initial view, a highlighted point, and a data layer from an API.
What Do You Need Before You Start?
MapLibre React Native is a native module, so you need a native toolchain as well as Node.js. Check these before Step 1:
| Requirement | Details |
|---|---|
| Node.js | A current LTS version |
| Expo | SDK 54 or newer (a peer dependency of the library); this tutorial is tested on SDK 57 |
| React Native | 0.80 or newer with the new architecture (the default in current Expo templates) |
| iOS | The full Xcode app (not only the Command Line Tools) with an iOS simulator, and CocoaPods. The current Xcode needs a recent macOS: check its requirement in the App Store before you start |
| Android | Android Studio with the Android SDK, and an emulator or a device (Android API level 23 or newer) |
| Geoapify API key | Free, see below |
To get the API key, sign up at Geoapify MyProjects, create a project, and copy its key. Our getting started guide for map tiles walks through the same steps with screenshots.
How Do You Add a Geoapify Map to an Expo App?
The seven steps below build the app incrementally. Steps 1–2 set up the project and the native build, Steps 3–5 put a map with a marker on the screen, and Steps 6–7 add live places and a style switch.
Step 1. Create the Expo app
Start with the blank TypeScript template so that the only code in the project is yours:
npx create-expo-app@latest maplibre-geoapify --template blank-typescript
cd maplibre-geoapify
You get a project with App.tsx, app.json, index.ts and package.json. You'll edit only App.tsx, plus a .env file for the API key.
Step 2. Install MapLibre React Native and build the app
Install the map library and expo-dev-client with npx expo install, which picks versions compatible with your Expo SDK:
npx expo install @maplibre/maplibre-react-native expo-dev-client
npm install --save-dev @types/geojson
The @types/geojson package provides the GeoJSON.FeatureCollection type used in Step 6. When npx expo install adds a package that ships a config plugin, it also adds the plugin to app.json. Check that the plugins array now contains MapLibre:
{
  "expo": {
    "plugins": [
      "@maplibre/maplibre-react-native"
    ]
  }
}
The plugin is required on iOS: it adds $MLRN.post_install(installer) to the post_install block of the generated ios/Podfile. On Android it's used only for customizations.
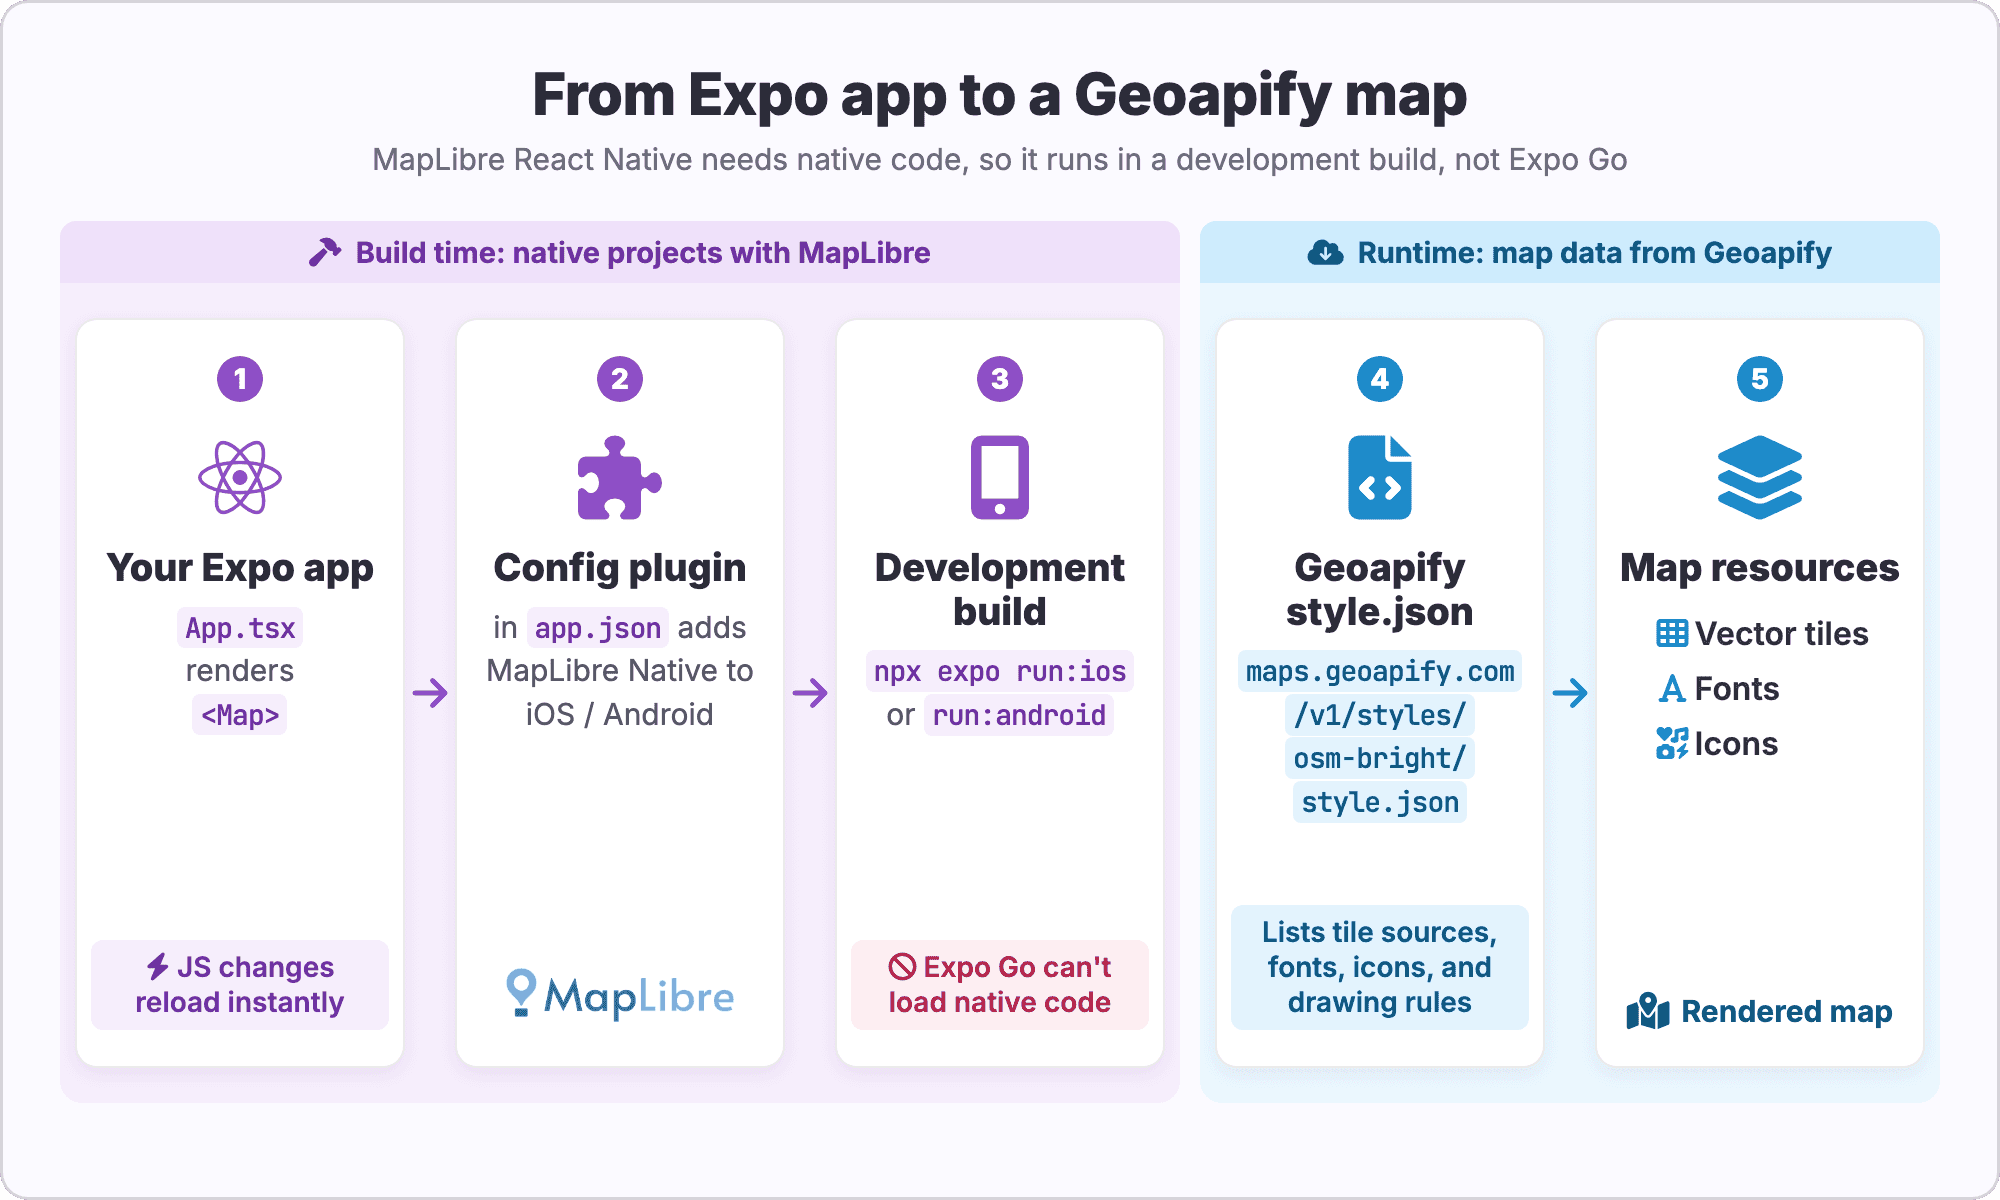
Why Expo Go doesn't work. Expo Go includes only the native modules of the Expo SDK, and MapLibre React Native isn't part of it. The library wraps MapLibre Native, so the native map renderer has to be compiled into your app. That's what a development build is: your own version of the app with all its native modules, plus the developer tools from expo-dev-client.
Note: enable scene support for iOS 27. Starting with iOS 27, Apple requires apps to use the UIScene life cycle, and an app built with Xcode 27 that doesn't adopt it stops at launch with a SIGTRAP crash before any JavaScript runs. Expo SDK 57 ships the needed scene delegate behind an opt-in flag (Expo 57.0.25 or newer); SDK 58 is expected to enable it in the template (expo/expo#46664). Until then, install expo-build-properties and turn the flag on:
npx expo install expo-build-properties{
"expo": {
"plugins": [
"@maplibre/maplibre-react-native",
["expo-build-properties", { "ios": { "enableSceneSupport": true } }]
]
}
}With the flag on, prebuild adds a UIApplicationSceneManifest with Expo's EXExpoAppSceneDelegate to Info.plist. If you already generated the ios/ folder, regenerate it with npx expo prebuild --platform ios --clean.
Build and start the app on a simulator, an emulator, or a connected device:
npx expo run:ios
# or
npx expo run:android
Note: CocoaPods on iOS. The iOS build needs CocoaPods. If it's missing, npx expo run:ios tries to install it with gem; if that fails (for example with a permissions or Ruby error), install it with Homebrew: brew install cocoapods, then run the command again.
The first run generates the ios/ and android/ native projects with the config plugin applied, compiles them, installs the app, and starts Metro. It takes a few minutes. When it finishes, you see the template's start screen. From now on, changes in App.tsx reload instantly; you need to rebuild only after you add native packages or change plugins in app.json.
Step 3. Show a Geoapify map
A MapLibre map needs a style: a style.json file that lists the vector tile sources, fonts, icons, and drawing rules. Geoapify map tiles come with ready-made styles, each served at a URL of this form:
https://maps.geoapify.com/v1/styles/{style}/style.json?apiKey=YOUR_API_KEYKeep the API key out of the code. Create a .env file next to package.json and add .env to .gitignore:
EXPO_PUBLIC_GEOAPIFY_API_KEY=YOUR_API_KEYExpo reads .env and inlines variables with the EXPO_PUBLIC_ prefix into the JavaScript bundle. Now replace App.tsx with a full-screen Map that loads the osm-bright style:
import { StyleSheet, View } from "react-native";
import { Map } from "@maplibre/maplibre-react-native";

// Your Geoapify API key, read from .env (EXPO_PUBLIC_GEOAPIFY_API_KEY=...)
const API_KEY = process.env.EXPO_PUBLIC_GEOAPIFY_API_KEY;

// Geoapify vector map styles: https://apidocs.geoapify.com/docs/maps/map-tiles/
const styleUrl = (style: string) =>
  `https://maps.geoapify.com/v1/styles/${style}/style.json?apiKey=${API_KEY}`;

export default function App() {
  return (
    <View style={styles.container}>
      <Map style={styles.map} mapStyle={styleUrl("osm-bright")} />
    </View>
  );
}

const styles = StyleSheet.create({
  container: { flex: 1 },
  map: { flex: 1 },
});
Expo CLI loads EXPO_PUBLIC_ variables from .env automatically; after creating or changing .env, do a full reload of the app (press r in the terminal running Expo) to pick up the value (Expo environment variables). The app now shows a world map in the osm-bright style with the attribution button in the corner. The mapStyle prop accepts a style URL or a style JSON object, and the attribution comes from the style itself. Note that importing Map from the library shadows the built-in JavaScript Map in this file.
To change the whole map design, change the style name. A few of the vector styles listed in the Geoapify Map Tiles documentation:
| Style ID | Look | Good for |
|---|---|---|
osm-bright | Colorful, detailed OpenStreetMap style | General-purpose app maps |
osm-bright-grey | OSM Bright in grey tones | Maps where your own data should stand out |
positron | Light and minimal | Data overlays and dashboards |
dark-matter | Dark and minimal | Dark mode, night use |
klokantech-basic | Simple and neutral | Clean background maps |
osm-liberty | Classic OpenStreetMap look | Navigation-like maps |
toner | High-contrast black and white | Print-like or accessibility-focused maps |
Step 4. Set the starting view with the Camera
Without a camera the map opens on the whole world. The Camera component's initialViewState sets where the map starts; the user can still pan and zoom afterwards. Add the import, the coordinates, and the Camera as a child of Map:
import {
  Camera,
  Map,
  type LngLat,
} from "@maplibre/maplibre-react-native";

// Santa Fe Plaza, New Mexico
const PLAZA: LngLat = [-105.9384, 35.6872];

// ...inside App():
<Map style={styles.map} mapStyle={styleUrl("osm-bright")}>
  <Camera initialViewState={{ center: PLAZA, zoom: 15 }} />
</Map>
The LngLat type is a [longitude, latitude] pair, the same order as GeoJSON and the Geoapify APIs. If the map opens in the wrong place, check that longitude comes first. At zoom 15 you see the streets around the plaza with building outlines and labels.
Step 5. Add a marker
A Marker places any React Native view at a coordinate. Its lngLat prop is required, anchor sets which part of the view touches the point (the default is "center"), and it expects exactly one child:
import { StyleSheet, Text, View } from "react-native";
import { Camera, Map, Marker, type LngLat } from "@maplibre/maplibre-react-native";

// ...inside <Map>, after <Camera />:
<Marker id="plaza" lngLat={PLAZA} anchor="bottom">
  <View style={styles.pin}>
    <Text style={styles.pinText}>Plaza</Text>
  </View>
</Marker>

// ...add to StyleSheet.create():
pin: {
  backgroundColor: "#7b3fbf",
  borderRadius: 14,
  paddingHorizontal: 10,
  paddingVertical: 5,
},
pinText: { color: "#ffffff", fontWeight: "600" },
With anchor="bottom", the bottom edge of the purple label sits on the plaza, so the label doesn't cover the point it marks. A Marker is a real native view, which is convenient for a few interactive points. For static content, the library docs suggest ViewAnnotation or a symbol layer for better performance; for the cafés you'll use a circle layer.
Step 6. Load places from the Places API
The Geoapify Places API finds places by category in an area and returns a GeoJSON FeatureCollection. This is the REST request the app sends for cafés around the plaza:
https://api.geoapify.com/v2/places?categories=catering.cafe&filter=circle:-105.9384,35.6872,800&bias=proximity:-105.9384,35.6872&limit=20&apiKey=YOUR_API_KEYEach parameter has one job:
categories=catering.cafeselects cafés (see the list of place categories for others);filter=circle:lon,lat,radiusMetersreturns only places within 800 m of the plaza;bias=proximity:lon,latorders the results by distance from the plaza;limit=20caps the result count, which keeps the request at 1 credit.
Simplified response (2 of 20 features, real data from October 6, 2026):
{
  "type": "FeatureCollection",
  "features": [
    {
      "type": "Feature",
      "properties": {
        "name": "The French Pastry Shop and Crêperie",
        "categories": ["catering", "catering.cafe"],
        "address_line2": "100 East San Francisco Street, Santa Fe, NM 87501, United States of America",
        "distance": 74
      },
      "geometry": { "type": "Point", "coordinates": [-105.9377747, 35.6867758] }
    },
    {
      "type": "Feature",
      "properties": {
        "name": "Wake Up Call",
        "categories": ["catering", "catering.cafe", "catering.cafe.coffee", "catering.cafe.coffee_shop"],
        "address_line2": "100 East San Francisco Street, Santa Fe, NM 87501, United States of America",
        "distance": 104
      },
      "geometry": { "type": "Point", "coordinates": [-105.9377109, 35.6864513] }
    }
  ]
}
The full response returns exactly 20 cafés, from 74 m to 641 m away; one of them has no name in OpenStreetMap, so don't assume every place has a name if you render labels. You can try the same request and other categories in the Places API Playground.
Because the response is already GeoJSON, you can pass it to a GeoJSONSource without conversion. Fetch it once when the app mounts and draw it with a circle Layer:
import { useEffect, useState } from "react";
import {
  Camera,
  GeoJSONSource,
  Layer,
  Map,
  Marker,
  type LngLat,
} from "@maplibre/maplibre-react-native";

// ...inside App():
const [cafes, setCafes] = useState<GeoJSON.FeatureCollection | null>(null);

// Load up to 20 cafés within 800 m of the plaza from the Geoapify Places API (20 places = 1 credit)
useEffect(() => {
  const [lon, lat] = PLAZA;
  const url =
    "https://api.geoapify.com/v2/places" +
    `?categories=catering.cafe` +
    `&filter=circle:${lon},${lat},800` +
    `&bias=proximity:${lon},${lat}` +
    `&limit=20&apiKey=${API_KEY}`;

  fetch(url)
    .then((response) => response.json())
    .then((data: GeoJSON.FeatureCollection) => setCafes(data));
}, []);

// ...inside <Map>, before the <Marker>:
{cafes && (
  <GeoJSONSource id="cafes" data={cafes}>
    <Layer
      id="cafe-circles"
      type="circle"
      paint={{
        "circle-radius": 7,
        "circle-color": "#e8762d",
        "circle-stroke-width": 2,
        "circle-stroke-color": "#ffffff",
      }}
    />
  </GeoJSONSource>
)}
Orange circles with a white outline appear around the plaza a moment after the map loads. The source is rendered only after the data arrives, so the map never receives an empty source. In v11, a single Layer with a type prop replaces CircleLayer, FillLayer, LineLayer and the other layer components.
The paint prop takes the kebab-case property names of the MapLibre style specification, for example "circle-radius", the same as in MapLibre GL JS, so you can copy layer definitions from web code or a style editor. The older style prop with camelCase names (circleRadius) still works in v11 but is deprecated and will be removed in v12.
Step 7. Switch between light and dark map styles
Switching the style is a state change: pass a different URL to mapStyle, and MapLibre loads the new style. Add a dark state, a button on top of the map, and a status bar that matches the map:
import { Pressable, StyleSheet, Text, View } from "react-native";
import { StatusBar } from "expo-status-bar";

// ...inside App():
const [dark, setDark] = useState(false);

// ...the Map gets a style that depends on the state:
<Map style={styles.map} mapStyle={styleUrl(dark ? "dark-matter" : "osm-bright")}>

// ...after </Map>:
<Pressable style={styles.button} onPress={() => setDark(!dark)}>
  <Text style={styles.buttonText}>{dark ? "Light map" : "Dark map"}</Text>
</Pressable>

<StatusBar style={dark ? "light" : "dark"} />
The button is absolutely positioned in the top-right corner (see the button style in the complete example). Tap it and the basemap changes to dark-matter; the café circles and the Plaza marker are children of Map, not part of the style, so they're drawn on top of either style. Keep in mind that each style has its own tiles, so the first switch to a new style loads new tiles.
How Do You Set It Up in a Bare React Native Project?
Without Expo, there's no config plugin, so you make its iOS change yourself. The app code from Steps 3–7 stays the same. The project must use the new architecture and React Native 0.80 or newer.
- Install the package:
npm install @maplibre/maplibre-react-native- iOS: add
$MLRN.post_install(installer)to thepost_installblock inios/Podfile:
post_install do |installer|
  # Other post install hooks...
  $MLRN.post_install(installer)
end- iOS: install the pods, then rebuild the app:
cd ios
pod install- Android: no extra setup is needed; rebuild the app.
Optional native settings go into gradle.properties on Android or global variables in the Podfile on iOS. The React Native setup guide and the customization guide list them.
What Changed in MapLibre React Native v11?
Version 11 is the first release that supports only the new architecture, and its API was aligned with MapLibre GL JS. If you're upgrading a v10 app, these are the renames you'll hit first:
| v10 | v11 |
|---|---|
<MapView> | <Map> |
scrollEnabled, zoomEnabled, rotateEnabled, pitchEnabled | dragPan; touchZoom, doubleTapZoom, doubleTapHoldZoom; touchRotate; touchPitch |
contentInset={[16, 16, 16, 16]} | contentInset={{ top: 16, right: 16, bottom: 16, left: 16 }} |
| Ornament props | attribution / logo / compass booleans; attributionPosition / logoPosition / compassPosition objects with top/bottom and left/right |
localizeLabels, regionWillChangeDebounceTime, regionDidChangeDebounceTime | Removed without replacement |
Camera centerCoordinate, zoomLevel, heading | center, zoom, bearing |
Camera defaultSettings | initialViewState |
<ShapeSource shape={…}> or url={…} | <GeoJSONSource data={…}> |
<CircleLayer>, <FillLayer>, <LineLayer>, … | <Layer type="circle">, type="fill", type="line", … |
<PointAnnotation coordinate={…}> | <ViewAnnotation lngLat={…}> |
<Light> component | light prop on Map |
Two behavior changes are worth knowing. Events now follow the NativeSyntheticEvent pattern, so the payload is in event.nativeEvent. On Android, Map renders with GLSurfaceView by default; use androidView="texture" to fall back to TextureView. The v11 migration guide covers the remaining changes, including UserLocation, OfflineManager and the imperative ref methods.
What About Attribution, Cost and the API Key?
Three practical questions come up before you ship a map app: what the map must display, what it costs, and how exposed the key is.
Attribution
When a map is created from a Geoapify style.json, the map attributions are added automatically, and MapLibre React Native shows them through its attribution button. Keep it enabled (don't set attribution={false}). If you hide or replace it, you must show the required credits yourself, as described in the Geoapify attribution docs:
Powered by Geoapify: required on the Free plan; paid plans include a white-label option;© OpenStreetMap contributors: the map data is licensed under ODbL 1.0;© OpenMapTiles: the vector tiles use the OpenMapTiles schema.
Cost
Geoapify bills API usage in credits. The numbers that matter for this app, from the Geoapify pricing:
| Usage | Cost | In this app |
|---|---|---|
| Free plan | 3,000 credits per day | — |
| Map tile request | 0.25 credits | 3,000 credits ≈ 12,000 tiles per day |
| Places API | 1 credit per 20 places | One request with limit=20 on each app start = 1 credit |
Tile usage depends on screen size, zoom changes, and how much users pan, so the simplest way to estimate it is to run the app on the Free plan and watch the statistics in your Geoapify project. According to the pricing docs, the limits are soft: requests aren't blocked when you exceed the daily quota.
API key safety
An EXPO_PUBLIC_ variable is compiled into the app bundle, so anyone who unpacks the app can read the key. Treat it as public:
- create a separate key for the mobile app, so you can monitor and replace it independently;
- watch its usage in your Geoapify project;
- know that Geoapify key restrictions work by IP address, HTTP referrer, origin and CORS, which native apps don't send;
- for stricter control, call the Places API through your own backend and keep that key on the server.
Complete Example
The full project, including app.json, .env.example and the ios/android scripts, is on GitHub: maplibre-react-native-expo-geoapify-map-tiles. Clone it, copy .env.example to .env, add your key, and run npm install and npm run ios or npm run android.
Tested with: Expo SDK 57 (expo 57.0.26, expo-build-properties with enableSceneSupport), React Native 0.86.3 (new architecture), @maplibre/maplibre-react-native 11.5.0, React 19.2.3, TypeScript 6.0, on an iPhone 18 Pro simulator with iOS 27.0 (Xcode 27.0), October 2026. The Android project and bundle were generated and built with the same code but not run on an Android device.
This is the complete App.tsx:
import { useEffect, useState } from "react";
import { Pressable, StyleSheet, Text, View } from "react-native";
import { StatusBar } from "expo-status-bar";
import {
  Camera,
  GeoJSONSource,
  Layer,
  Map,
  Marker,
  type LngLat,
} from "@maplibre/maplibre-react-native";

// Your Geoapify API key, read from .env (EXPO_PUBLIC_GEOAPIFY_API_KEY=...)
const API_KEY = process.env.EXPO_PUBLIC_GEOAPIFY_API_KEY;

// Geoapify vector map styles: https://apidocs.geoapify.com/docs/maps/map-tiles/
const styleUrl = (style: string) =>
  `https://maps.geoapify.com/v1/styles/${style}/style.json?apiKey=${API_KEY}`;

// Santa Fe Plaza, New Mexico
const PLAZA: LngLat = [-105.9384, 35.6872];

export default function App() {
  const [dark, setDark] = useState(false);
  const [cafes, setCafes] = useState<GeoJSON.FeatureCollection | null>(null);

  // Load up to 20 cafés within 800 m of the plaza from the Geoapify Places API (20 places = 1 credit)
  useEffect(() => {
    const [lon, lat] = PLAZA;
    const url =
      "https://api.geoapify.com/v2/places" +
      `?categories=catering.cafe` +
      `&filter=circle:${lon},${lat},800` +
      `&bias=proximity:${lon},${lat}` +
      `&limit=20&apiKey=${API_KEY}`;

    fetch(url)
      .then((response) => response.json())
      .then((data: GeoJSON.FeatureCollection) => setCafes(data));
  }, []);

  return (
    <View style={styles.container}>
      <Map style={styles.map} mapStyle={styleUrl(dark ? "dark-matter" : "osm-bright")}>
        <Camera initialViewState={{ center: PLAZA, zoom: 15 }} />

        {cafes && (
          <GeoJSONSource id="cafes" data={cafes}>
            <Layer
              id="cafe-circles"
              type="circle"
              paint={{
                "circle-radius": 7,
                "circle-color": "#e8762d",
                "circle-stroke-width": 2,
                "circle-stroke-color": "#ffffff",
              }}
            />
          </GeoJSONSource>
        )}

        <Marker id="plaza" lngLat={PLAZA} anchor="bottom">
          <View style={styles.pin}>
            <Text style={styles.pinText}>Plaza</Text>
          </View>
        </Marker>
      </Map>

      <Pressable style={styles.button} onPress={() => setDark(!dark)}>
        <Text style={styles.buttonText}>{dark ? "Light map" : "Dark map"}</Text>
      </Pressable>

      <StatusBar style={dark ? "light" : "dark"} />
    </View>
  );
}

const styles = StyleSheet.create({
  container: { flex: 1 },
  map: { flex: 1 },
  pin: {
    backgroundColor: "#7b3fbf",
    borderRadius: 14,
    paddingHorizontal: 10,
    paddingVertical: 5,
  },
  pinText: { color: "#ffffff", fontWeight: "600" },
  button: {
    position: "absolute",
    top: 60,
    right: 16,
    backgroundColor: "#ffffff",
    borderRadius: 20,
    paddingHorizontal: 14,
    paddingVertical: 8,
    elevation: 3,
    shadowColor: "#000000",
    shadowOpacity: 0.2,
    shadowRadius: 4,
    shadowOffset: { width: 0, height: 2 },
  },
  buttonText: { fontWeight: "600" },
});
What's Next
You now have a working native map with live place data. These resources help you take it further:
- Compare all map styles and tile options in the Geoapify Map Tiles overview → and the Map Tiles documentation →
- Search other categories, areas and conditions with the Places API → and test them in the Places API Playground →
- Show opening hours, contacts and other details for a tapped café with the Place Details API →
- Building for the web too? Read Adding OpenStreetMap-based maps to a React app →
FAQ
Why does my Expo app crash at launch on iOS 27?
Apps built with Xcode 27 must adopt the UIScene life cycle; without it iOS 27 stops the app at launch (SIGTRAP) before any JavaScript runs. In Expo SDK 57, install expo-build-properties and set "ios": { "enableSceneSupport": true } in its plugin options, then regenerate the iOS project with npx expo prebuild --platform ios --clean. See expo/expo#46664.
Can I use MapLibre React Native in Expo Go?
No. MapLibre React Native contains native code that isn't part of the Expo SDK, so it can't run in Expo Go. Install expo-dev-client and run the app as a development build with npx expo run:ios or npx expo run:android. See the MapLibre React Native Expo setup.
Is Geoapify free for mobile maps?
Yes, within the Free plan: 3,000 credits per day, where a map tile costs 0.25 credits (about 12,000 tiles per day) and every 20 places from the Places API cost 1 credit. The Free plan requires the Geoapify attribution. See Geoapify pricing.
What changed between MapView and Map in v11?
MapView was renamed to Map, interaction props were aligned with MapLibre GL JS (for example scrollEnabled became dragPan), contentInset takes an object, and ornaments use attribution/logo/compass props. v11 also supports only the new architecture. See the v11 migration guide.
Which style URL should I use?
Use https://maps.geoapify.com/v1/styles/{style}/style.json?apiKey=YOUR_API_KEY with a vector style such as osm-bright, positron or dark-matter. The style already includes tiles, fonts, icons and attribution. All styles are listed in the Map Tiles documentation.
How do I keep my API key safe in a mobile app?
Treat it as public: an EXPO_PUBLIC_ variable is compiled into the app bundle. Use a separate key for the app and watch its usage in Geoapify MyProjects. Key restrictions by IP address, HTTP referrer, origin and CORS don't apply to native app requests, so for stricter control call the Places API through your own backend.
Does MapLibre React Native work in a bare React Native app?
Yes, with React Native 0.80 or newer and the new architecture. Install the package, add $MLRN.post_install(installer) to the post_install block of ios/Podfile, run pod install, and rebuild. Android needs no extra setup. See the React Native setup guide.