


On this page
Default map pins work for a quick demo, but real applications often need custom map marker icons for brands, categories, statuses, and clearer visual scanning. A store locator, delivery dashboard, real estate map, or travel app can use different marker styles to show what each location means before the user clicks anything. In this guide, we will use PNG/JPG marker images that can be reused across:
- Google Maps - widely used for commercial web and mobile maps, with marker icons for stores, assets, and POIs.
- Leaflet - a lightweight open-source map library where PNG markers can be added with
L.icon(). - MapLibre GL - a vector map library where marker images can be used in HTML markers or symbol layers.
Geoapify Map Marker API helps generate those marker images as URLs, so the same marker can be used in different map libraries with less manual asset work.
When Custom Map Marker Icons Are Useful
Default map markers are intentionally simple: usually a single pin shape, one color, and no extra context. That is fine when a map shows only one location, but it becomes less useful when users need to compare many places or understand what each point represents.
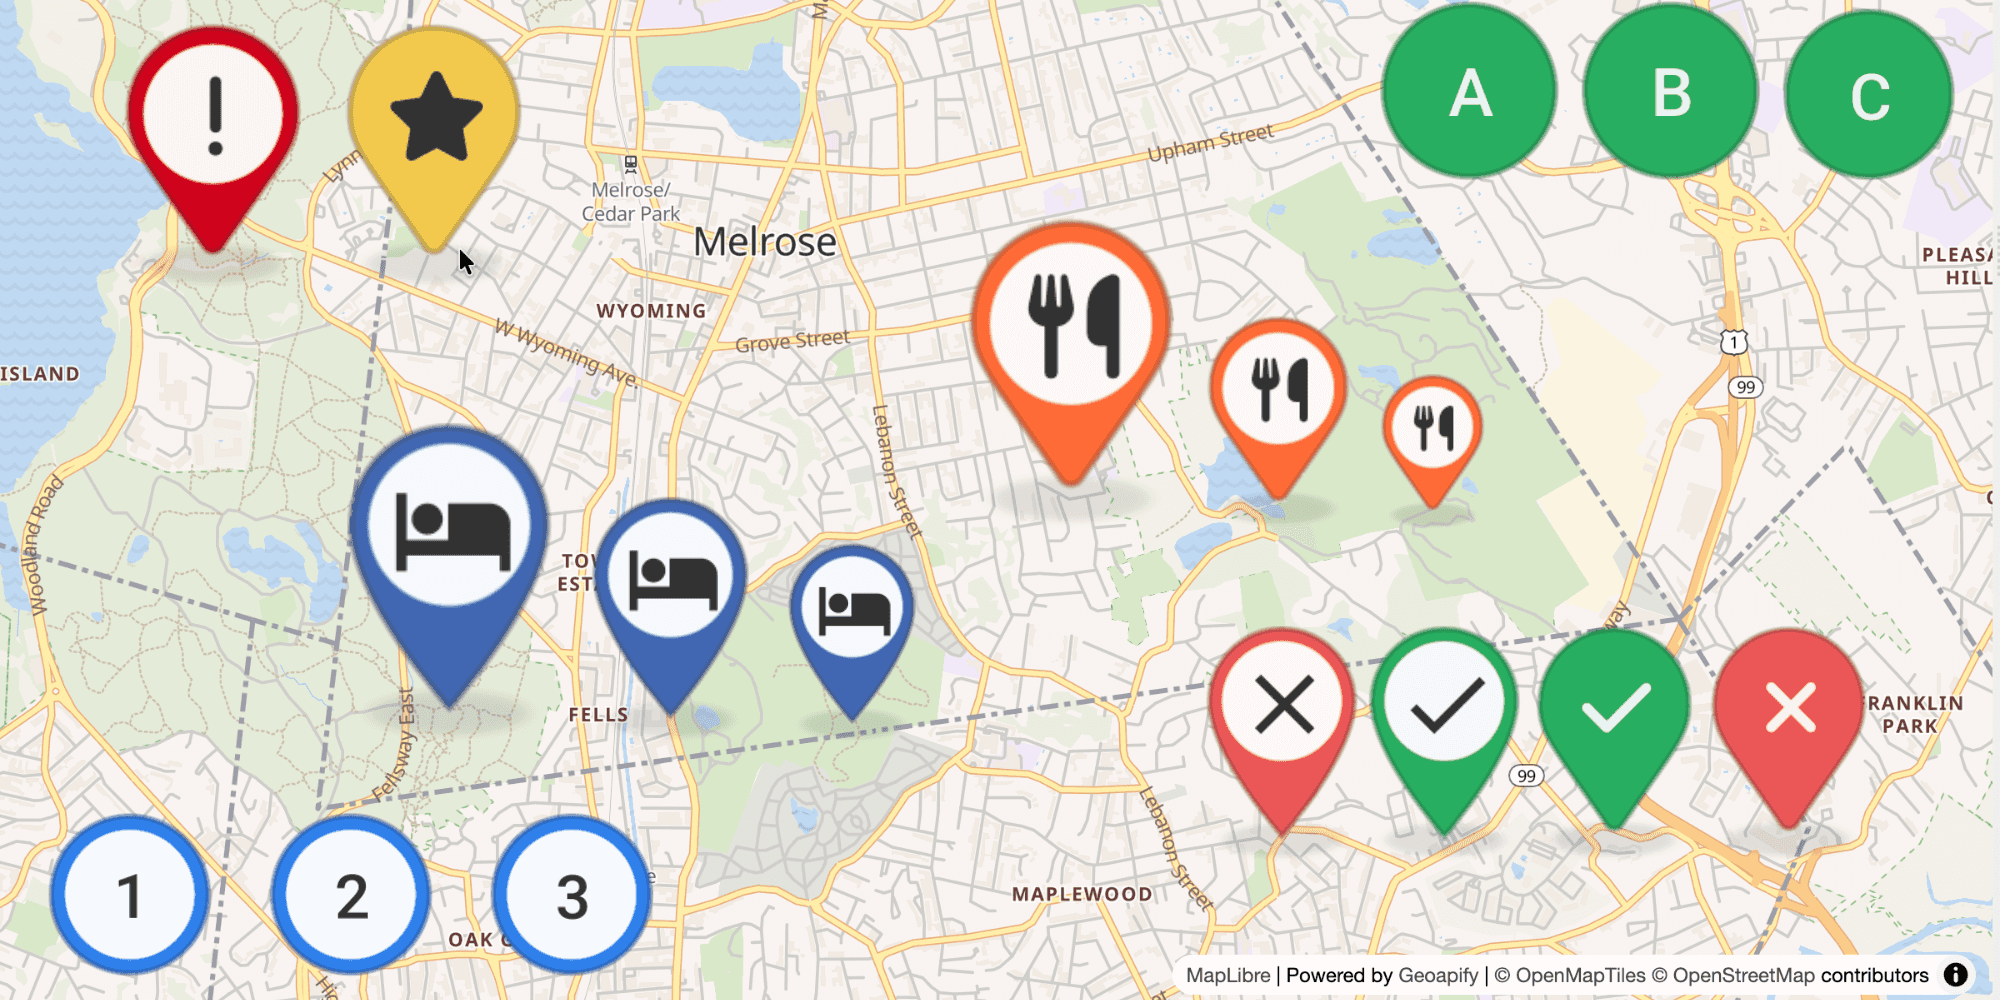
Here are default markers from popular map libraries:
Custom marker icons add extra information directly on the map, before a user opens a popup or reads a side panel. Instead of showing every location with the same default pin, each marker can communicate something useful:
- Place type - restaurants, hotels, parking lots, warehouses, service points, or customer locations.
- Status - open or closed stores, active or completed deliveries, available or occupied assets.
- Priority - urgent incidents, selected results, promoted locations, or recommended stops.
- Brand or product context - company-colored pins, campaign markers, or product-specific icons.
- Map readability - clearer scanning when many points appear close together.
What Is a Custom Map Marker?
A custom map marker is a visual replacement for the default pin. Most map libraries support this by letting you pass an image, usually a PNG or JPG, as a marker URL or file path.
Usually, custom markers are image files stored somewhere and served from a static URL. They can also be generated dynamically, for example with different text labels like 1, 2, 3, 4, or with changing colors, sizes, shapes, and icons.
| Static images | Dynamic images |
|---|---|
| How it works: You create image files in advance, such as restaurant-marker.png or hotel-marker.png, and use those files as marker images.Best for: A small fixed set of marker styles that does not change often. | How it works: You generate marker images from parameters such as color, size, shape, icon, or text. Best for: Many marker variations, generated on demand without manually exporting each image. |
Static images are enough when the design is fixed. When marker styles depend on categories, statuses, sizes, labels, or brand colors, it is easier to generate marker images from parameters instead of preparing every file manually.
Creating a Marker Icon with API
Geoapify Map Marker API lets you dynamically generate custom map marker images with URL parameters. You can choose a marker style, set colors and sizes, and add icon content from Font Awesome, Material Icons, or Lucide Icons.
The result is an image URL that can be used directly in Google Maps, Leaflet, MapLibre GL, OpenLayers, and other mapping libraries that accept custom marker image URLs.
| Parameter | Example | Description |
|---|---|---|
type | awesome | Marker style or shape. Common options include awesome, material, and circle. |
color | %23ff6b35 | Marker background color. Use URL-encoded hex colors, where # becomes %23. |
size | 60 | Marker image size in pixels. |
icon | utensils | Icon name shown inside the marker. |
text | 1 | Short text label shown inside the marker, such as a number or letter. |
iconType | awesome | Icon set for the marker content: awesome, material, or lucide. |
contentSize | 24 | Size of the icon or text inside the marker. |
contentColor | %23ffffff | Color of the icon or text inside the marker. |
scaleFactor | 2 | Creates a higher-resolution marker for retina displays. |
apiKey | YOUR_API_KEY | Your Geoapify API key. |
For example, this URL generates an orange restaurant marker with a Font Awesome utensils icon:
https://api.geoapify.com/v2/icon/?type=awesome&color=%23ff6b35&size=60&icon=utensils&iconType=awesome&contentSize=24&contentColor=%23ffffff&scaleFactor=2&apiKey=YOUR_API_KEYOnce you have the marker image URL, the remaining step is to pass it to your map library as the marker icon. Here is how it works in Google Maps first.
How to Use a Custom Marker Icon in Google Maps
Google Maps supports custom graphic markers with the Advanced Markers API. The idea is simple: create an image element, set its src to your marker image URL, and use that image as the marker graphic.
For numbered pin markers like 1, 2, 3, 4, generate a separate Geoapify Marker Icon URL for each number. The noWhiteCircle parameter keeps the number directly on the pin:
https://api.geoapify.com/v2/icon/?type=awesome&color=%232f80ed&size=60&text=1&contentSize=18&contentColor=%23ffffff&noWhiteCircle&scaleFactor=2&apiKey=YOUR_API_KEY
https://api.geoapify.com/v2/icon/?type=awesome&color=%232f80ed&size=60&text=2&contentSize=18&contentColor=%23ffffff&noWhiteCircle&scaleFactor=2&apiKey=YOUR_API_KEY
https://api.geoapify.com/v2/icon/?type=awesome&color=%232f80ed&size=60&text=3&contentSize=18&contentColor=%23ffffff&noWhiteCircle&scaleFactor=2&apiKey=YOUR_API_KEY
https://api.geoapify.com/v2/icon/?type=awesome&color=%232f80ed&size=60&text=4&contentSize=18&contentColor=%23ffffff&noWhiteCircle&scaleFactor=2&apiKey=YOUR_API_KEY
Marker size in this example:
size=60sets the height of the marker pin itself.- The generated image also includes the marker shadow, so the full displayed marker becomes
46x67CSS pixels. - With
scaleFactor=2, the actual PNG is generated at92x134pixels for sharper rendering on retina screens. - The shadow takes
14pxin the generated image, or7pxafter scaling down to CSS pixels.
You can check the final generated image size by opening the marker URL in a browser. Because the shadow is part of the image, the Google Maps anchor should point to the pin tip above the shadow, not to the bottom edge of the image.
Then pass those image URLs to Google Maps markers:
async function addNumberedMarkers(map) {
const { AdvancedMarkerElement } = await google.maps.importLibrary("marker");
const markerColor = "%232f80ed";
const markerWidth = 46;
const markerHeight = 67;
const markerShadowOffset = 7;
const locations = [
{ name: "Location 1", lat: 40.7128, lng: -74.0060 },
{ name: "Location 2", lat: 40.7152, lng: -74.0021 },
{ name: "Location 3", lat: 40.7181, lng: -74.0102 },
{ name: "Location 4", lat: 40.7214, lng: -74.0048 }
];
locations.forEach((location, index) => {
const markerNumber = index + 1;
const markerIconUrl = `https://api.geoapify.com/v2/icon/?type=awesome&color=${markerColor}&size=60&text=${markerNumber}&contentSize=18&contentColor=%23ffffff&noWhiteCircle&scaleFactor=2&apiKey=YOUR_API_KEY`;
const markerImage = document.createElement("img");
markerImage.src = markerIconUrl;
markerImage.alt = `Marker ${markerNumber}`;
markerImage.style.width = `${markerWidth}px`;
markerImage.style.height = `${markerHeight}px`;
const marker = new AdvancedMarkerElement({
map,
position: { lat: location.lat, lng: location.lng },
title: location.name,
anchorLeft: `-${markerWidth / 2}px`,
anchorTop: `-${markerHeight - markerShadowOffset}px`
});
marker.append(markerImage);
});
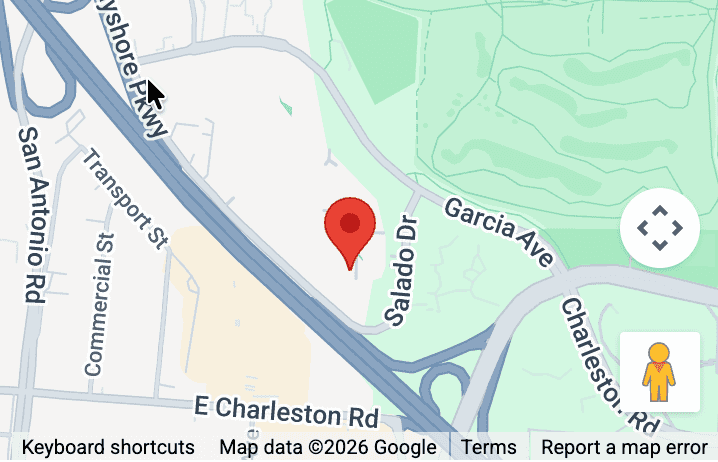
}Here is how this can look on a Google Maps map:
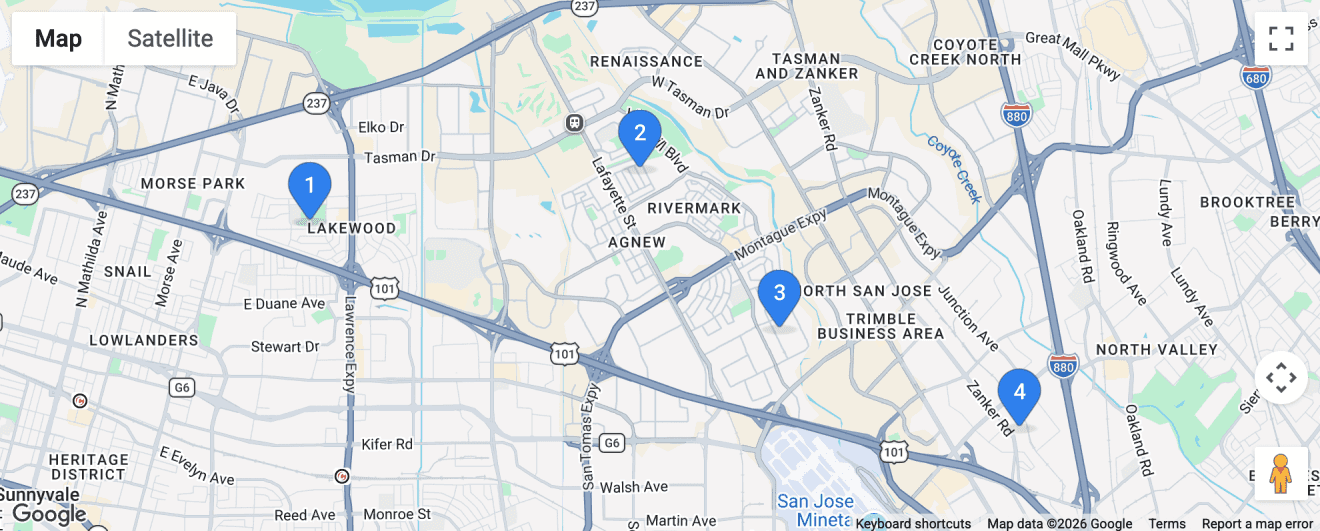
This approach works well when marker numbers, colors, or sizes are generated from your data. For example, a route planner can use 1, 2, 3, 4 for stop order, while a search results map can use the same pattern for ranked results.
How to Use a Custom Marker Icon in Leaflet
Leaflet uses L.icon() to define a custom marker image, then passes that icon to L.marker(). This example shows places with a priority value from 0 to 1, where low-priority places are green and high-priority places become red.
const API_KEY = "YOUR_API_KEY";

const locations = [
  { name: "Low priority", lat: 51.505, lon: -0.09, priority: 0 },
  { name: "Medium priority", lat: 51.51, lon: -0.1, priority: 0.5 },
  { name: "High priority", lat: 51.515, lon: -0.11, priority: 1 }
];

function priorityToColor(priority) {
  const value = Math.max(0, Math.min(1, priority));
  const stops = [
    { value: 0, color: { r: 39, g: 174, b: 96 } }, // green
    { value: 0.33, color: { r: 242, g: 201, b: 76 } }, // yellow
    { value: 0.66, color: { r: 242, g: 153, b: 74 } }, // orange
    { value: 1, color: { r: 235, g: 87, b: 87 } } // red
  ];

  const endIndex = stops.findIndex((stop) => value <= stop.value);
  const end = stops[endIndex];
  const start = stops[Math.max(0, endIndex - 1)];
  const ratio = (value - start.value) / (end.value - start.value || 1);
  const r = Math.round(start.color.r + (end.color.r - start.color.r) * ratio);
  const g = Math.round(start.color.g + (end.color.g - start.color.g) * ratio);
  const b = Math.round(start.color.b + (end.color.b - start.color.b) * ratio);

  return `#${[r, g, b].map((color) => color.toString(16).padStart(2, "0")).join("")}`;
}

function createPriorityMarkerIcon(priority) {
  const color = encodeURIComponent(priorityToColor(priority));
  const iconUrl = `https://api.geoapify.com/v2/icon/?type=awesome&color=${color}&size=60&icon=flag&contentSize=18&contentColor=%23ffffff&noWhiteCircle&scaleFactor=2&apiKey=${API_KEY}`;

  return L.icon({
    iconUrl,
    // Display size of the generated marker image in CSS pixels.
    iconSize: [46, 67],
    // Bottom-center of the visible pin, adjusted above the shadow.
    iconAnchor: [23, 60],
    // Open the popup above the marker.
    popupAnchor: [0, -62]
  });
}

locations.forEach((location) => {
  L.marker([location.lat, location.lon], {
    icon: createPriorityMarkerIcon(location.priority)
  })
    .bindPopup(`${location.name}: priority ${location.priority}`)
    .addTo(map);
});
The priorityToColor() function converts a numeric priority into a color scale: green, yellow, orange, then red. A priority of 0 becomes green, 1 becomes red, and values between them move through yellow and orange.
The createPriorityMarkerIcon() function then adds that color to the Geoapify Marker Icon API URL. Leaflet receives the generated image URL through L.icon(), so every marker can have its own color without preparing separate image files.
For example, the generated marker URLs can look like this:
# priority: 0
https://api.geoapify.com/v2/icon/?type=awesome&color=%2327ae60&size=60&icon=flag&contentSize=18&contentColor=%23ffffff&noWhiteCircle&scaleFactor=2&apiKey=YOUR_API_KEY
# priority: 0.5
https://api.geoapify.com/v2/icon/?type=awesome&color=%23f2b04b&size=60&icon=flag&contentSize=18&contentColor=%23ffffff&noWhiteCircle&scaleFactor=2&apiKey=YOUR_API_KEY
# priority: 1
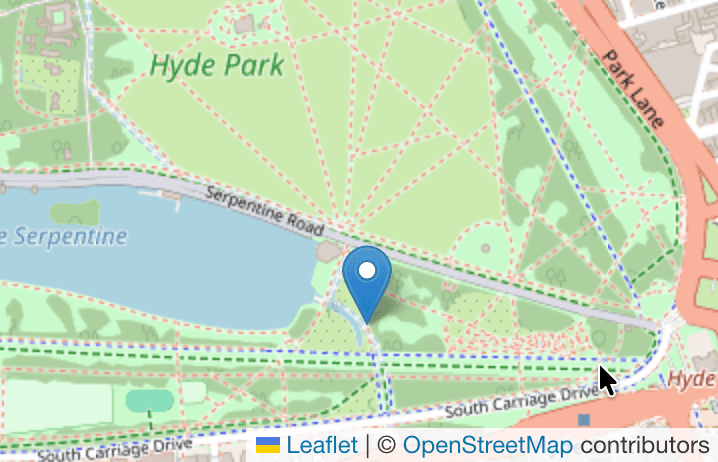
https://api.geoapify.com/v2/icon/?type=awesome&color=%23eb5757&size=60&icon=flag&contentSize=18&contentColor=%23ffffff&noWhiteCircle&scaleFactor=2&apiKey=YOUR_API_KEYHere is how priority-based custom markers can look in Leaflet:

How to Use a Custom Marker Icon in MapLibre GL
In MapLibre GL, one practical way to use custom marker images is to create an HTML marker element and pass it to new maplibregl.Marker({ element }). This follows the same pattern as the official custom marker example. This example uses different Geoapify marker icons for different restaurant categories.
const API_KEY = "YOUR_API_KEY";
const restaurantIconCategories = {
"burger": ["catering.restaurant.american", "catering.restaurant.burger"],
"pizza-slice": ["catering.restaurant.italian", "catering.restaurant.pizza"],
"fish": ["catering.restaurant.fish", "catering.restaurant.sushi"],
"shrimp": ["catering.restaurant.seafood", "catering.restaurant.tapas"],
"drumstick-bite": ["catering.restaurant.chicken", "catering.restaurant.kebab"],
"pepper-hot": ["catering.restaurant.mexican", "catering.restaurant.tacos"],
"bowl-rice": ["catering.restaurant.asian", "catering.restaurant.thai"],
"fire": ["catering.restaurant.barbecue"]
};
const restaurants = [
{
name: "Burger Place",
coordinates: [-80.6045, 28.0733],
categories: ["catering.restaurant", "catering.restaurant.burger"]
},
{
name: "Pizza Corner",
coordinates: [-80.6072, 28.0711],
categories: ["catering.restaurant", "catering.restaurant.pizza"]
},
{
name: "Sushi Bar",
coordinates: [-80.6013, 28.0754],
categories: ["catering.restaurant", "catering.restaurant.sushi"]
}
];
function getRestaurantIconName(categories) {
const categorySet = new Set(categories || []);
for (const [iconName, iconCategories] of Object.entries(restaurantIconCategories)) {
if (iconCategories.some((category) => categorySet.has(category))) {
return iconName;
}
}
return "utensils";
}
function restaurantMarkerIconUrl(iconName) {
return `https://api.geoapify.com/v2/icon/?type=material&color=%23E35D5B&size=50&iconType=awesome&icon=${iconName}&contentSize=20&scaleFactor=2&noWhiteCircle&apiKey=${API_KEY}`;
}
function createRestaurantMarker(categories) {
const markerElement = document.createElement("div");
const markerIcon = document.createElement("img");
markerIcon.src = restaurantMarkerIconUrl(getRestaurantIconName(categories));
markerIcon.alt = "Restaurant";
markerIcon.style.width = "40px";
markerIcon.style.height = "58px";
markerElement.appendChild(markerIcon);
return markerElement;
}
restaurants.forEach((restaurant) => {
new maplibregl.Marker({
element: createRestaurantMarker(restaurant.categories),
anchor: "bottom",
offset: [0, 5]
})
.setLngLat(restaurant.coordinates)
.setPopup(new maplibregl.Popup().setText(restaurant.name))
.addTo(map);
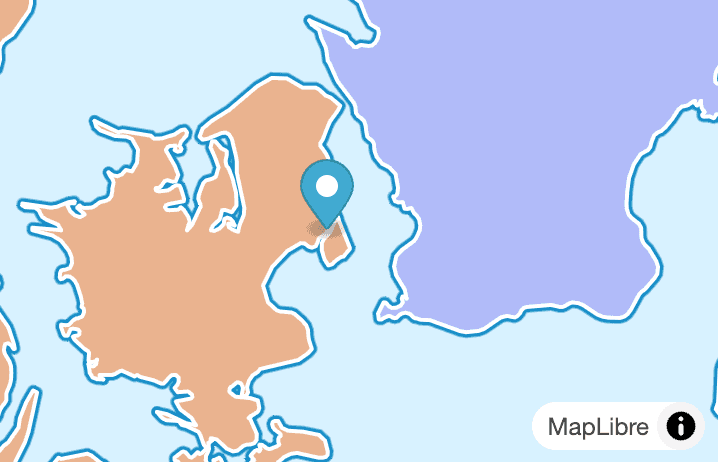
});Here is how category-based restaurant markers can look in MapLibre GL:
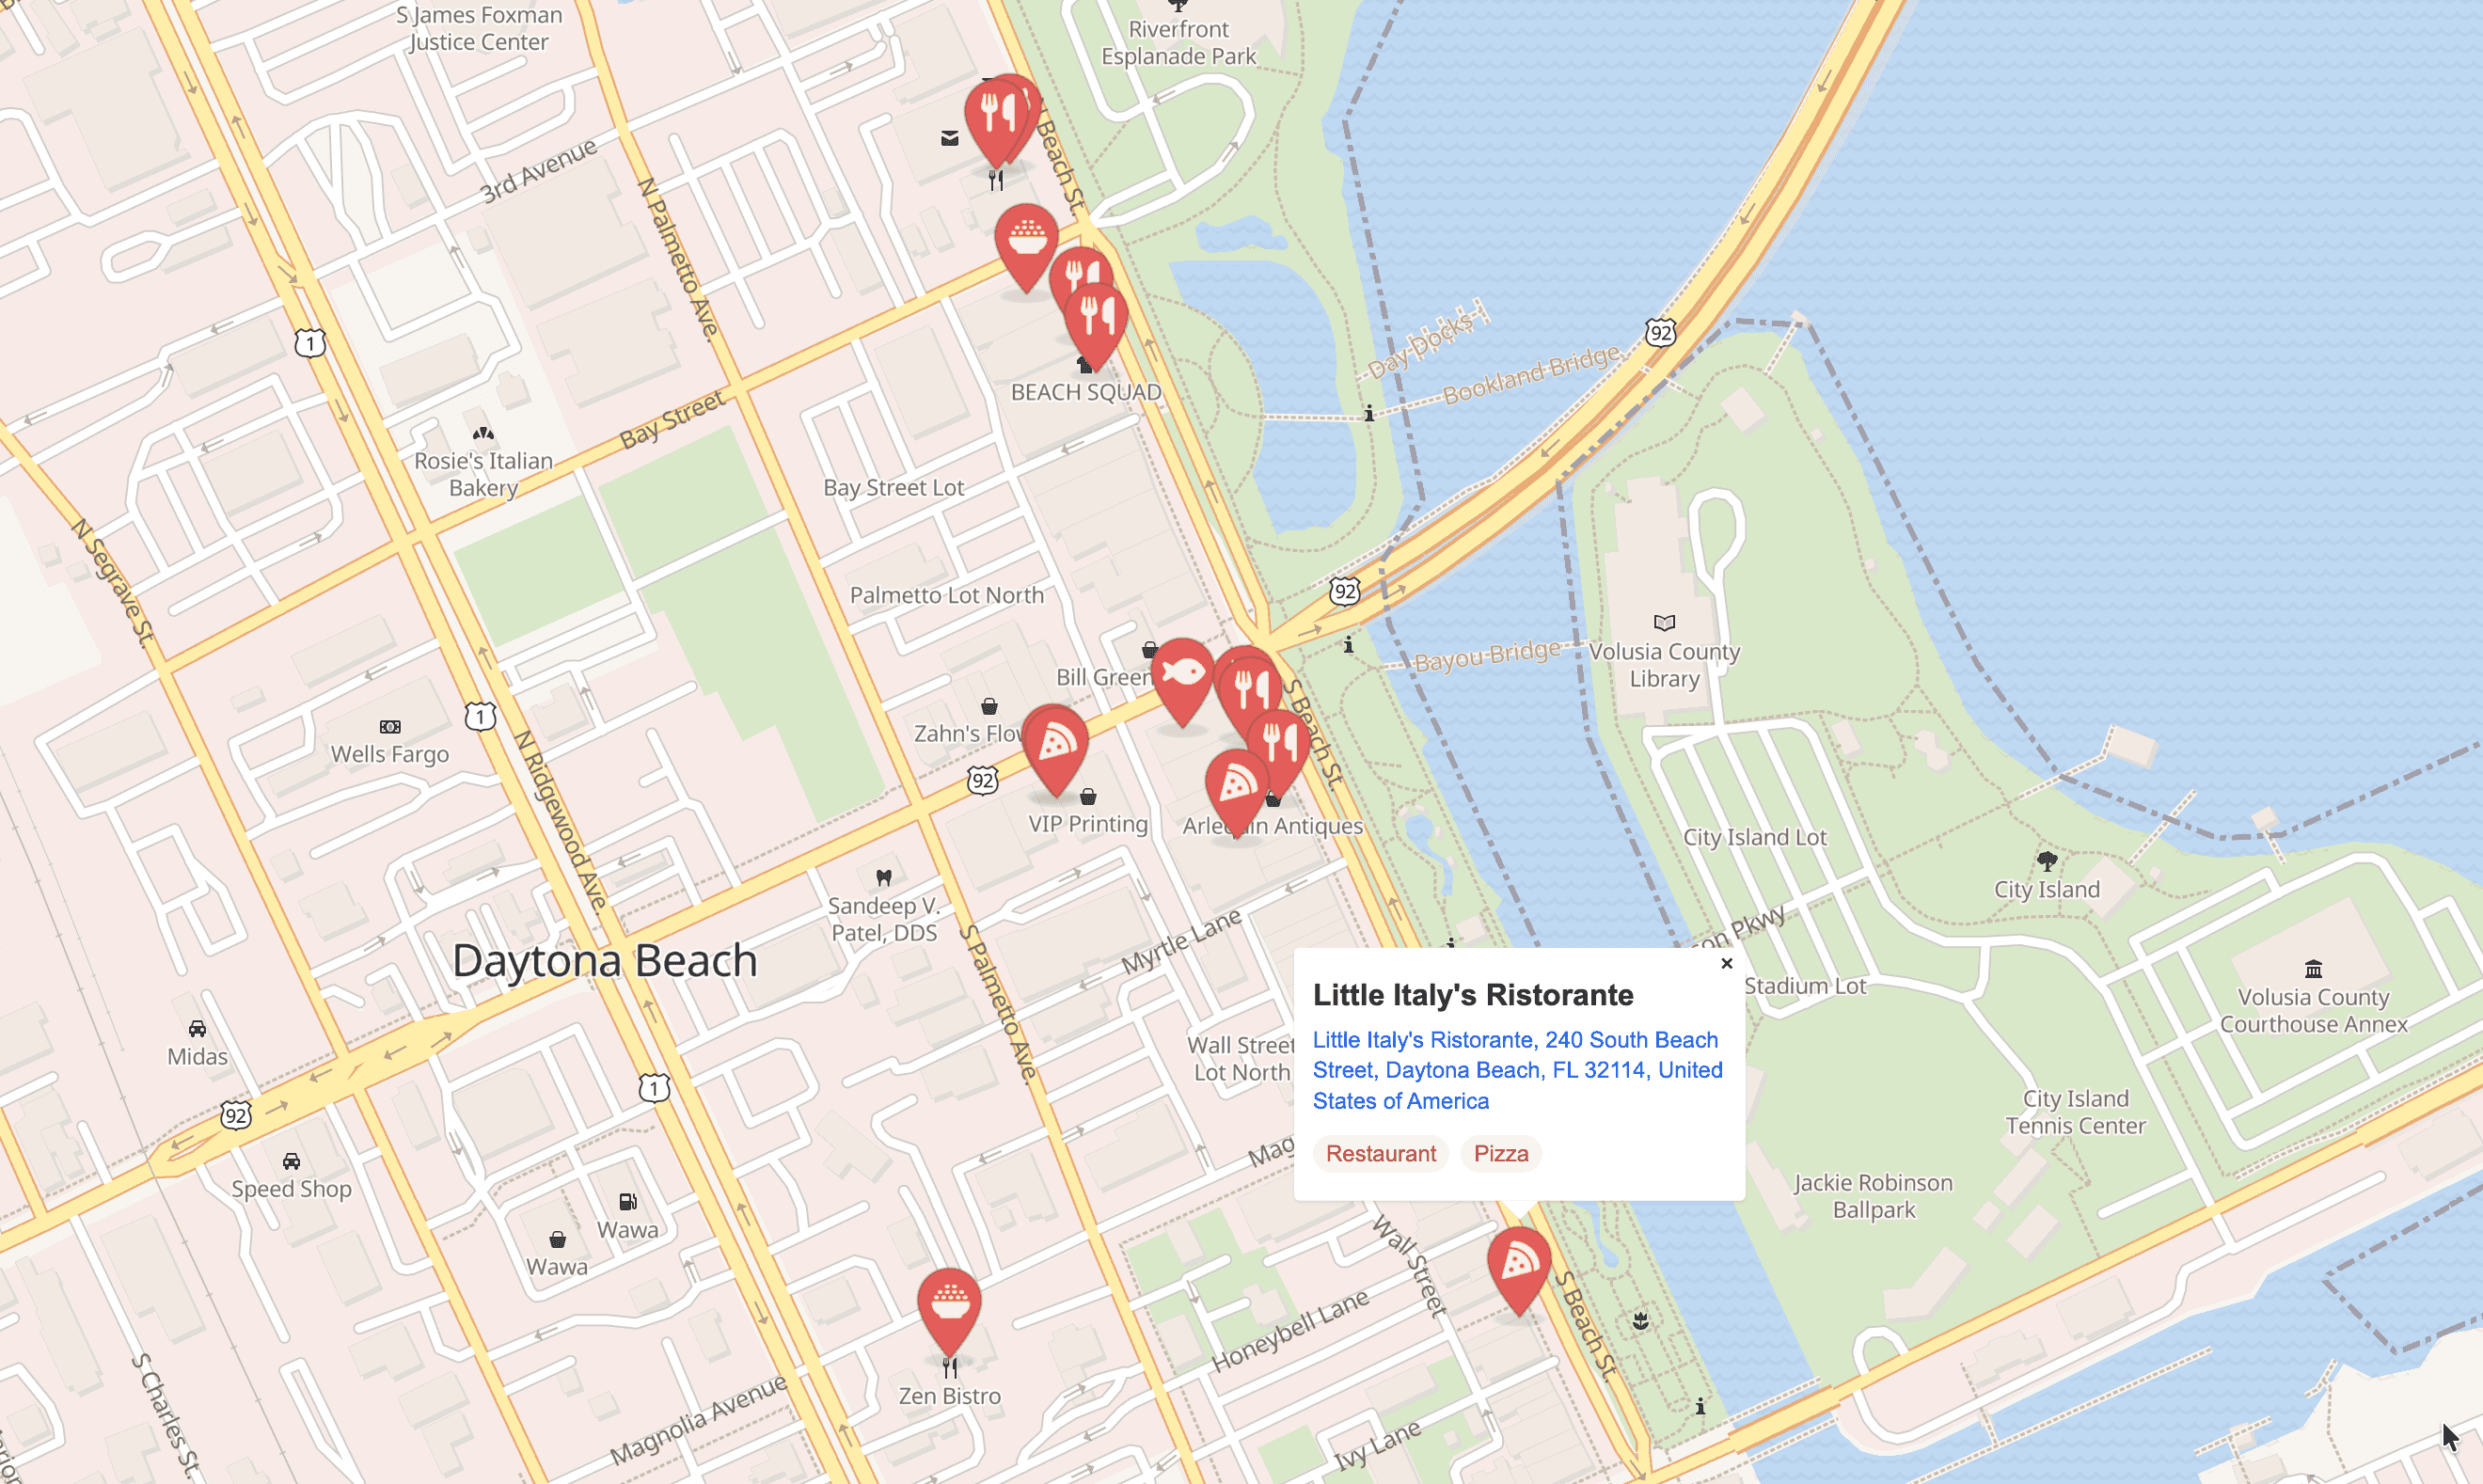
Here, getRestaurantIconName() chooses an icon from the restaurant categories, and restaurantMarkerIconUrl() turns that icon name into a Geoapify Marker Icon API URL. MapLibre GL receives the generated image through a normal HTML <img> element, while setPopup() attaches a popup to each marker.
Other Map Libraries
The same Geoapify marker image URL can be used in other map libraries that support custom image markers. The exact option name changes by library, but the idea is the same: pass the generated PNG/JPG URL as the marker image.
| Library | How custom marker images are usually added | Docs |
|---|---|---|
| OpenLayers | Use ol.style.Icon for point features. | Icon example |
| Mapbox GL JS | Use an HTML marker with a custom element, or load an image for a symbol layer. | Custom marker |
| HERE Maps | Use an image icon with H.map.Icon. | Marker objects |
| Azure Maps | Use custom image sprites or HTML markers. | Add custom HTML markers |
Best Practices for Map Marker Icons
Custom marker icons work best when they add information without making the map harder to read. Keep the marker design simple, consistent, and easy to recognize at normal map zoom levels.
- Use strong contrast - the icon or text inside the marker should stay readable on light and dark map areas.
- Keep marker meaning consistent - do not use the same color for different statuses or the same icon for unrelated categories.
- Set the anchor point correctly - the coordinate should match the visible pin tip, not the bottom of the full image when the image includes a shadow.
- Avoid long text inside markers - short labels like
1,A, orPwork better than words. - Use retina images when needed -
scaleFactor=2keeps markers sharp on high-density screens, but remember to display them at the CSS size. - Cluster dense maps - if many markers overlap, use clustering or filtering instead of relying on marker icons alone.
Learn More
Related Geoapify resources for marker icons, map libraries, and map customization:


Map Marker Icon API - Custom Map Icons as PNG | Geoapify


Map Marker Icons generator - create beautiful icons for your map


Create custom map marker icon with Leaflet


Map libraries comparison: Leaflet vs MapLibre GL vs OpenLayers - trends and statistics
FAQ
How do I change a Google Maps marker icon?
In Google Maps JavaScript, use a custom image for the marker. With Advanced Markers, create an img element, set its src to your marker image URL, and pass it to new google.maps.marker.AdvancedMarkerElement().
How do I create a Google Map with multiple custom markers?
Create an array of locations, generate or assign a marker image URL for each location, and loop through the array to create one marker per item. Use the Geoapify Map Marker Icon API when marker icons need dynamic numbers, colors, or category symbols.
How do I set a marker icon in Google Maps Android?
In Google Maps Android, create a marker with MarkerOptions and set a custom bitmap with icon(BitmapDescriptorFactory.fromBitmap(...)) or use a drawable resource with BitmapDescriptorFactory.fromResource(...).
How do I use a custom marker icon in Leaflet?
Use L.icon() with an iconUrl, then pass the icon to L.marker(). For accurate placement, also set iconSize, iconAnchor, and popupAnchor.
How do I add a custom marker icon in MapLibre GL?
In MapLibre GL, create an HTML element, add an img inside it, and pass the element to new maplibregl.Marker({ element }). This works well when marker images come from dynamic URLs such as Geoapify Marker Icon API URLs.
Can I use the same marker icon URL in different map libraries?
Yes. If the marker icon is a PNG or JPG image URL, you can usually reuse it in Google Maps, Leaflet, MapLibre GL, OpenLayers, Mapbox GL JS, HERE Maps, Azure Maps, and other libraries that support custom image markers.
What size should a custom map marker icon be?
A common marker display size is around 40-60 CSS pixels high. If you use retina output, such as scaleFactor=2 in the Map Marker Icon API, generate a larger PNG but display it at the intended CSS size so it stays sharp without appearing too large.
How do I set the correct anchor point for a custom marker icon?
Set the anchor point to the visible pin tip, not necessarily the bottom of the full image. If the marker image includes a shadow, adjust the anchor above the shadow so the coordinate points to the actual location. In Leaflet this is iconAnchor; in Google Maps Advanced Markers, use marker anchor options.